Databinding in RecyclerView - Android - Kotlin
Hey Guyss!!
Already we have seen the basics of Databinding and how to use it in previous post.
Now let's see how to use Databinding in RecyclerView. And Its gonna be a short post. ;)
You can find the Project in GitHub.
First, we have enable dataBinding in app-level build.gradle
android {
dataBinding {
enabled = true
}
}
Next, we have add the following plugin.
apply plugin: 'kotlin-kapt'
Next, we have to include dependency for databinding, (Not needed, if using Android Studio 3.2 or above, since its already bundled)
kapt "com.android.databinding:compiler:3.2.0-alpha10"
recycler_item.xml
Already we have seen the basics of Databinding and how to use it in previous post.
Now let's see how to use Databinding in RecyclerView. And Its gonna be a short post. ;)
You can find the Project in GitHub.
Prerequisite:
build.gradleFirst, we have enable dataBinding in app-level build.gradle
android {
dataBinding {
enabled = true
}
}
Next, we have add the following plugin.
apply plugin: 'kotlin-kapt'
Next, we have to include dependency for databinding, (Not needed, if using Android Studio 3.2 or above, since its already bundled)
kapt "com.android.databinding:compiler:3.2.0-alpha10"
Implementation:
We can directly bind the data to RecyclerView's Adapter layout. So, let's design the main RecyclerView's layout as simple as ever.
activity_recycler.xml
<?xml version="1.0" encoding="utf-8"?>
<android.support.v7.widget.RecyclerView
    xmlns:android="http://schemas.android.com/apk/res/android"
    android:id="@+id/recyclerView"
    android:layout_width="match_parent"
    android:layout_height="match_parent" />
RecyclerActivity.kt
Lets create data for RecyclerView and then set the layoutManager and the data to it. Then lets set an adapter for that RecyclerView.
Lets create data for RecyclerView and then set the layoutManager and the data to it. Then lets set an adapter for that RecyclerView.
class RecyclerActivity : AppCompatActivity() {

    private var userList = ArrayList<User>()

    override fun onCreate(savedInstanceState: Bundle?) {
        super.onCreate(savedInstanceState)
        setContentView(R.layout.activity_recycler)

        loadData()
        setAdapter()
    }

    private fun loadData() {
        userList.add(User("Riya","+919876543210",""))
        userList.add(User("Percy","+919876543210",""))
        userList.add(User("Ron","+919876543210",""))
        userList.add(User("Prachi","+919876543210",""))
        userList.add(User("Leo","+919876543210",""))
        userList.add(User("Luke","+919876543210",""))
        userList.add(User("Sadie","+919876543210",""))
        userList.add(User("Magnus","+919876543210",""))
        userList.add(User("Apollo","+919876543210",""))

    }

    private fun setAdapter() {
        recyclerView?.apply {
            layoutManager = LinearLayoutManager(this@RecyclerActivity)
            addItemDecoration(DividerItemDecoration(this@RecyclerActivity, DividerItemDecoration.VERTICAL))
            adapter = RecyclerRAdapter(this@RecyclerActivity, userList)
        }
    }
}
AdapterClass:
Lets first inflate the layout for the Adapter. Then we should bind the data to it with the help of generated binding class. Note that, if we do have layout as activity_main, then the generated class will be named as ActivityMainBinding. So, in our case, we do have layout as recycler_item.xml, so the generated class is RecyclerItemBinding.
Here,
BR - generated class ;
BR.model - 'model' is variable name declared in layout ;
Then, we have to bind the data according to its position.
RecyclerRAdapter.kt
First, we should inflate RecyclerView's item layout with the help of DataBindingUtil, instead of LayoutInflater.
 override fun onCreateViewHolder(parent: ViewGroup, viewType: Int): Adapter.ViewHolder {
        val binding: ItemBinding = DataBindingUtil.inflate(LayoutInflater.from(context), R.layout.item_layout, parent, false)
        return Adapter.ViewHolder(binding)
 }
Next, ViewHolder have to be created as follows:
class ViewHolder(val binding: ItemBinding) : RecyclerView.ViewHolder(binding.root) {
        fun bind(data: Any) {
            binding.setVariable(BR.model, data)
            binding.executePendingBindings()
        }
 }
BR - generated class ;
BR.model - 'model' is variable name declared in layout ;
Then, we have to bind the data according to its position.
override fun onBindViewHolder(holder: Adapter.ViewHolder, position: Int) {
        holder.bind(dataList.get(position))
}
RecyclerRAdapter.kt
class RecyclerRAdapter(var context: Context, var list: ArrayList<User>) : RecyclerView.Adapter<RecyclerRAdapter.ViewHolder>() {

    // Inflating Layout and ViewHolder
    override fun onCreateViewHolder(parent: ViewGroup, viewType: Int): RecyclerRAdapter.ViewHolder {
        val binding: RecyclerItemBinding = DataBindingUtil.inflate(LayoutInflater.from(context), R.layout.recycler_item, parent, false)
        return RecyclerRAdapter.ViewHolder(binding)
    }

    override fun getItemCount(): Int = list.size

    // Bind data
    override fun onBindViewHolder(holder: RecyclerRAdapter.ViewHolder, position: Int) {
        holder.bind(list.get(position))
    }

    // Creating ViewHolder
    class ViewHolder(val binding: RecyclerItemBinding) : RecyclerView.ViewHolder(binding.root) {
        fun bind(data: Any) {
            binding.setVariable(BR.user, data) //BR - generated class; BR.user - 'user' is variable name declared in layout
            binding.executePendingBindings()
        }
    }

}
recycler_item.xml
<?xml version="1.0" encoding="utf-8"?>
<layout>
    <data>
        <variable
            name="user"
            type="com.yamikrish.databindingapp.model.User">
        </variable>
    </data>

    <android.support.constraint.ConstraintLayout xmlns:android="http://schemas.android.com/apk/res/android"
        xmlns:app="http://schemas.android.com/apk/res-auto"
        android:layout_width="match_parent"
        android:layout_height="wrap_content"
        android:padding="10dp">

        <TextView
            android:id="@+id/name"
            android:layout_width="0dp"
            android:layout_height="wrap_content"
            android:padding="5dp"
            android:text="@{user.name}"
            android:textAppearance="@android:style/TextAppearance.Medium"
            app:layout_constraintLeft_toLeftOf="parent"
            app:layout_constraintRight_toRightOf="parent" />

        <TextView
            android:id="@+id/mobile"
            android:layout_width="0dp"
            android:layout_height="wrap_content"
            android:padding="5dp"
            android:text="@{user.mobile}"
            android:textAppearance="@android:style/TextAppearance.Medium"
            app:layout_constraintLeft_toLeftOf="parent"
            app:layout_constraintRight_toRightOf="parent"
            app:layout_constraintTop_toBottomOf="@+id/name" />

    </android.support.constraint.ConstraintLayout>

</layout>
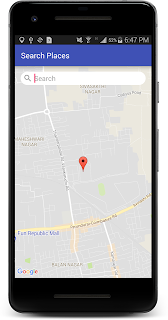
Run Application:


Thanks a lot, this is hard to find on the internet.
ReplyDeleteNice one ..Got a brief idea. Thanking for the knowlege ..Keep sharing
ReplyDelete.
Thanks for sharing. It would be great if you can share github repo.
ReplyDeleteIf you could share API call using json data to handle recylerview adapter using one sample.It useful and I have not clear idea to apply in code.
ReplyDeleteThis comment has been removed by the author.
ReplyDeleteThis comment has been removed by the author.
ReplyDeleteGreat job on this content!
ReplyDeleteThis post is very useful for Android developers and app development companies. It explains the process very concisely and smoothly. I have also checked a GitHub link for Databinding reference, which is very useful.
ReplyDeleteImpressive Article. Thanks for sharing the information.
ReplyDeleteAzure DevOps Training Online
Azure DevOps Online Training
Azure DevOps Online Training in Hyderabad
Azure DevOps Course Online
Microsoft Azure DevOps Online Training
Azure DevOps Training in Hyderabad
Azure DevOps Training
Azure DevOps Training in Ameerpet
Databinding in RecyclerView simplifies code, boosts performance, and ensures a clean architecture. To implement it effectively, consider expert assistance. Hire Kotlin Developers who can optimize binding logic, improve UI responsiveness, and deliver scalable Android apps with maintainable code structures.
ReplyDelete