Shimmer Layout like Facebook in Android - Kotlin
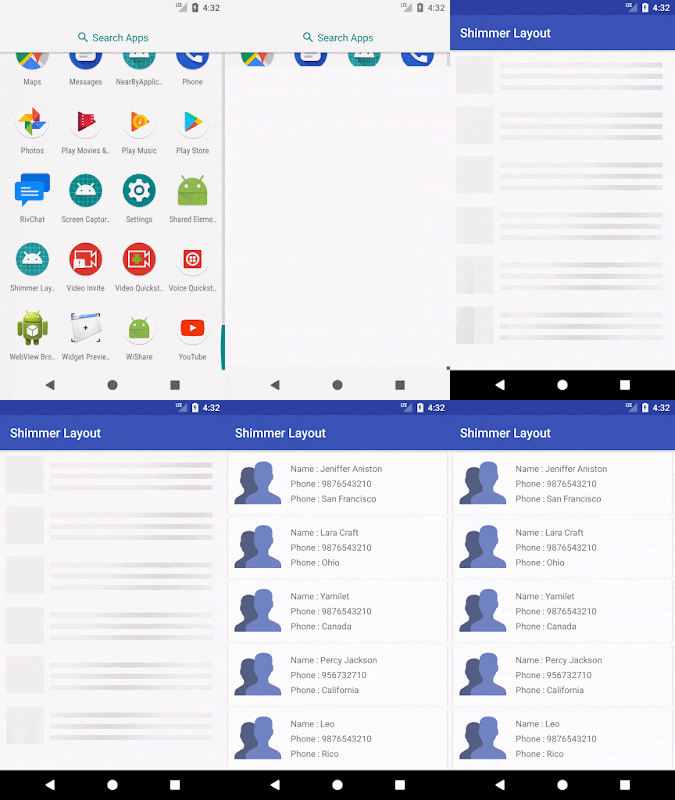
While loading data from API, we used to show boring loaders. But in Facebook's app, one loading screen will be displayed. That one looks interesting know. We can also do that shimmer effect in our Andorid App using Shimmer library by Facebook. Let's start.
2. Then include that placeholder layout to the ShimmerLayout.
3. Next design adapter layout for RecyclerView.
Implementation:
build.gradle
Include the following in app-level gradle file.
implementation 'com.facebook.shimmer:shimmer:0.1.0'
colors.xml
Include the following color in values -> colors.xml
<color name="placeholder_color">#dddddd</color>
Design:
1. First we have to design placeholder layout that is similar to your RecyclerView's adapter layout.
placeholder.xml
<?xml version="1.0" encoding="utf-8"?>
<android.support.constraint.ConstraintLayout xmlns:android="http://schemas.android.com/apk/res/android"
    xmlns:app="http://schemas.android.com/apk/res-auto"
    android:layout_width="match_parent"
    android:layout_height="match_parent"
    android:padding="10dp">

    <View
        android:id="@+id/image_holder"
        android:layout_width="60dp"
        android:layout_height="60dp"
        android:background="@color/placeholder_color"
        app:layout_constraintLeft_toLeftOf="parent"
        app:layout_constraintTop_toTopOf="parent" />


    <View
        android:id="@+id/name_holder"
        android:layout_width="0dp"
        android:layout_height="8dp"
        android:background="@color/placeholder_color"
        app:layout_constraintLeft_toRightOf="@+id/image_holder"
        app:layout_constraintRight_toRightOf="parent"
        app:layout_constraintTop_toTopOf="parent"
        android:layout_margin="10dp"/>

    <View
        android:id="@+id/phone_holder"
        android:layout_width="0dp"
        android:layout_height="8dp"
        android:layout_margin="10dp"
        android:background="@color/placeholder_color"
        app:layout_constraintLeft_toRightOf="@+id/image_holder"
        app:layout_constraintRight_toRightOf="parent"
        app:layout_constraintTop_toBottomOf="@+id/name_holder" />

    <View
        android:id="@+id/location_holder"
        android:layout_width="0dp"
        android:layout_height="8dp"
        android:layout_margin="10dp"
        android:background="@color/placeholder_color"
        app:layout_constraintLeft_toRightOf="@+id/image_holder"
        app:layout_constraintRight_toRightOf="parent"
        app:layout_constraintTop_toBottomOf="@+id/phone_holder" />


</android.support.constraint.ConstraintLayout>
2. Then include that placeholder layout to the ShimmerLayout.
<?xml version="1.0" encoding="utf-8"?>
<android.support.constraint.ConstraintLayout xmlns:android="http://schemas.android.com/apk/res/android"
    android:layout_width="match_parent"
    android:layout_height="match_parent"
    xmlns:app="http://schemas.android.com/apk/res-auto">

    <com.facebook.shimmer.ShimmerFrameLayout
        android:id="@+id/shimmerLayout"
        android:layout_width="0dp"
        android:layout_height="0dp"
        app:layout_constraintLeft_toLeftOf="parent"
        app:layout_constraintRight_toRightOf="parent"
        app:layout_constraintTop_toTopOf="parent"
        app:layout_constraintBottom_toBottomOf="parent">


        <LinearLayout
            android:layout_width="match_parent"
            android:layout_height="wrap_content"
            android:orientation="vertical">

            <include layout="@layout/placeholder"/>

            <include layout="@layout/placeholder"/>

            <include layout="@layout/placeholder"/>

            <include layout="@layout/placeholder"/>

            <include layout="@layout/placeholder"/>

            <include layout="@layout/placeholder"/>


        </LinearLayout>


    </com.facebook.shimmer.ShimmerFrameLayout>

    <android.support.v7.widget.RecyclerView
        android:id="@+id/recyclerView"
        android:layout_width="0dp"
        android:layout_height="0dp"
        app:layout_constraintBottom_toBottomOf="parent"
        app:layout_constraintEnd_toEndOf="parent"
        app:layout_constraintStart_toStartOf="parent"
        app:layout_constraintTop_toTopOf="parent" />

</android.support.constraint.ConstraintLayout>
3. Next design adapter layout for RecyclerView.
list_item.xml
<?xml version="1.0" encoding="utf-8"?>
<android.support.constraint.ConstraintLayout xmlns:android="http://schemas.android.com/apk/res/android"
    xmlns:app="http://schemas.android.com/apk/res-auto"
    android:layout_width="match_parent"
    android:layout_height="wrap_content"
    android:layout_marginTop="5dp">

    <android.support.v7.widget.CardView
        android:layout_width="0dp"
        android:layout_height="wrap_content"
        android:layout_margin="5dp"
        android:elevation="3dp"
        app:layout_constraintLeft_toLeftOf="parent"
        app:layout_constraintRight_toRightOf="parent">

        <LinearLayout
            android:layout_width="match_parent"
            android:layout_height="wrap_content"
            android:orientation="horizontal">

            <ImageView
                android:layout_width="75dp"
                android:layout_height="75dp"
                android:layout_margin="10dp"
                android:scaleType="centerCrop"
                android:src="@drawable/user"/>

            <LinearLayout
                android:layout_width="match_parent"
                android:layout_height="wrap_content"
                android:layout_marginTop="10dp"
                android:layout_marginRight="10dp"
                android:layout_marginBottom="10dp"
                android:orientation="vertical">

                <TextView
                    android:id="@+id/name"
                    android:layout_width="wrap_content"
                    android:layout_height="wrap_content"
                    android:text="Name"
                    android:padding="5dp" />

                <TextView
                    android:id="@+id/phone"
                    android:layout_width="wrap_content"
                    android:layout_height="wrap_content"
                    android:paddingLeft="5dp"
                    android:paddingRight="5dp"
                    android:text="453345435"
                    />

                <TextView
                    android:id="@+id/location"
                    android:layout_width="wrap_content"
                    android:layout_height="wrap_content"
                    android:padding="5dp"
                    android:text="Madurai"/>

            </LinearLayout>

        </LinearLayout>
    </android.support.v7.widget.CardView>

</android.support.constraint.ConstraintLayout>
Code:
ShimmerActivity.kt
Here, we can show the shimmer Layout before setting the values to ArrayList. For starting animation, startShimmerAnimation() can be used and for stoping it, stopShimmerAnimation() can be used.
class ShimmerActivity : AppCompatActivity() {

    /** Declare variables **/
    private var list: MutableList<User> = ArrayList<User>()
    lateinit var adapter: RecyclerAdapter

    override fun onCreate(savedInstanceState: Bundle?) {
        super.onCreate(savedInstanceState)
        setContentView(R.layout.shimmer_layout)

        shimmerLayout.startShimmerAnimation()

        Handler().postDelayed( {
            shimmerLayout.stopShimmerAnimation()
            shimmerLayout.visibility = View.GONE
            setValues()
        },5000)

    }

    private fun setValues() {
        /** Adding values **/
        list.add(User("Jeniffer Aniston","9876543210", "San Francisco"))
        list.add(User("Lara Craft","9876543210","Ohio"))
        list.add(User("Yamilet","9876543210","Canada"))
        list.add(User("Percy Jackson","956732710","California"))
        list.add(User("Leo","9876543210", "Rio"))
        list.add(User("Piper Jason","9876543210", "California"))
        list.add(User("Thalia Grace","9876543210", "Norway"))
        list.add(User("Frank","95673210","NewYork"))

        Log.v("list","list=="+list);

        recyclerView.layoutManager = LinearLayoutManager(this, LinearLayout.VERTICAL, false)
        adapter = RecyclerAdapter(this@ShimmerActivity, list);
        recyclerView.adapter = adapter
    }
}
RecyclerAdapter.kt
Create an Adapter class for RecyclerView.
class RecyclerAdapter(val context: Context, val data: MutableList<User>) :
        RecyclerView.Adapter<RecyclerAdapter.ViewHolder>() {

    override fun onBindViewHolder(holder: ViewHolder?, position: Int) {
        if (holder != null)
            holder.bindItems(data.get(position))
    }

    override fun onCreateViewHolder(parent: ViewGroup?, viewType: Int): ViewHolder {
        val v = LayoutInflater.from(context).inflate(R.layout.list_item, parent, false)
        return ViewHolder(v)
    }

    override fun getItemCount(): Int {
        return data.size
    }

    class ViewHolder(itemView: View?) : RecyclerView.ViewHolder(itemView) {
        fun bindItems(map: User) {
            itemView.name.text = "Name : " + map.name
            itemView.phone.text = "Phone : " + map.phone
            itemView.location.text = "Phone : " + map.location
        }
    }
}
Run Application:
Finally, the app will be as follows:


Comments
Post a Comment