Exploring Databinding Library in Android - Kotlin
Introduction:
Data binding library is a support library, which allows us to bind data sources directly to UI components of layout file.
Binding components this way, reduces boilerplate code in our business logic where we usually update UI when new data is available. It also improves app's performance and helps to prevent memory leak and NullPointerException.
Binding components this way, reduces boilerplate code in our business logic where we usually update UI when new data is available. It also improves app's performance and helps to prevent memory leak and NullPointerException.
textView.text = user.name
can be written simply in layout as follows, and no need to write in Activity class.
<TextView
...
android:text="@{user.name}" />
You can find the project in Github.
Prerequisite:
build.gradle
- First, we have enable dataBinding in app-level build.gradle
dataBinding {
enabled = true
}
}
- Next, we have add the following plugin.
- Next, we have to include dependency for databinding,
So, the app-level build.gradle will be as follows:
apply plugin: 'com.android.application'
apply plugin: 'kotlin-android'
apply plugin: 'kotlin-android-extensions'
apply plugin: 'kotlin-kapt'

android {
    compileSdkVersion 27
    defaultConfig {
        applicationId "com.yamikrish.databindingapp"
        minSdkVersion 16
        targetSdkVersion 27
        versionCode 1
        versionName "1.0"
        testInstrumentationRunner "android.support.test.runner.AndroidJUnitRunner"
    }
    buildTypes {
        release {
            minifyEnabled false
            proguardFiles getDefaultProguardFile('proguard-android.txt'), 'proguard-rules.pro'
        }
    }
    dataBinding {
        enabled = true
    }
}

dependencies {
    implementation fileTree(dir: 'libs', include: ['*.jar'])
    implementation "org.jetbrains.kotlin:kotlin-stdlib-jre7:$kotlin_version"
    kapt "com.android.databinding:compiler:3.2.0-alpha10"

    implementation 'com.android.support:appcompat-v7:27.1.1'
    implementation 'com.android.support.constraint:constraint-layout:1.1.0'
    implementation 'com.github.bumptech.glide:glide:4.7.1'
    annotationProcessor 'com.github.bumptech.glide:compiler:4.7.1'
    testImplementation 'junit:junit:4.12'
    androidTestImplementation 'com.android.support.test:runner:1.0.2'
    androidTestImplementation 'com.android.support.test.espresso:espresso-core:3.0.2'
}
Things to Know:
- For Layout:
To bind the data in Layout file, first we have to include the following tags in the order.
<layout>
<data>
<variable
name = "user"
type = "com.example.app.model" />
<variable
name = "user2"
type = "com.example.app.model2" />
....
....
</data>
</layout>
<!-- Any Design Here -->
<LinearLayout
.....
...
</LinearLayout>
We can declare any no. of Variables as per the no. of models you're gonna use in that layout. Using the variable's name we declared, we can set data for UI component, like,
"@{user.name}"
Once the layout is written, navigate to Build -> Clean Project and then do Build -> Rebuild Project to generate the necessary Binding Classes.
- For Class:
We don't need to write setContentView in Activity, instead we have use the autogenerated BindingClass to set UI for that activity. i.e., If your layout name is activity_main, BindingClass will be generated in the name as ActivityMainBinding . Then we have to use that inside Activity with the help of DataBindingUtil.
DataBindingUtil.setContentView<ActivityMainBinding>(context, R.layout.activity_main)
Let's Code:
(i) Simple DataBinding
First, let's do simple data binding, i.e., just binding the User model's value directly in UI components.
activity_main.xml
Design the layout to show the name and mobile number of User and to bind the values of User Model.
<?xml version="1.0" encoding="utf-8"?>
<layout>
    <data>

        <variable
            name="user"
            type="com.yamikrish.databindingapp.model.User" />

    </data>

    <android.support.constraint.ConstraintLayout
        xmlns:android="http://schemas.android.com/apk/res/android"
        xmlns:app="http://schemas.android.com/apk/res-auto"
        android:layout_width="match_parent"
        android:layout_height="match_parent">

        <TextView
            android:id="@+id/name"
            android:layout_width="match_parent"
            android:layout_height="wrap_content"
            android:text="@{user.name}"
            android:padding="5dp"
            app:layout_constraintLeft_toLeftOf="parent"
            app:layout_constraintRight_toRightOf="parent"
            app:layout_constraintTop_toTopOf="parent" />

        <TextView
            android:layout_width="match_parent"
            android:layout_height="wrap_content"
            android:text="@{user.mobile}"
            android:padding="5dp"
            app:layout_constraintLeft_toLeftOf="parent"
            app:layout_constraintRight_toRightOf="parent"
            app:layout_constraintTop_toBottomOf="@+id/name" />

    </android.support.constraint.ConstraintLayout>
</layout>
MainActivity.kt
Bind the layout to MainActivity using DataBindingUtil and ActivityMainBinding, also bind the data model class, User values to it.
class MainActivity : AppCompatActivity() {

    override fun onCreate(savedInstanceState: Bundle?) {
        super.onCreate(savedInstanceState)
        val binding = DataBindingUtil.setContentView<ActivityMainBinding>(this, R.layout.activity_main)
        val user = User("Yami","919999999999")
        binding.user = user
    }
}
User.kt
data class User(var name: String, var mobile: String)
Run Application:
(ii) With Click:
Click handlers should also be declared as <variable> inside <layout>. And a separate class ClickHandler have to be added inside that all our listeners can be handled in the form of methods/functions.<variable
name="handler"
type="com.example.app.your_class_name"/>
ClickHandler.kt
class ClickHandlers(val context: Context) {
    fun onClicked(view: View) {
        Toast.makeText(context, "Item clicked!", Toast.LENGTH_SHORT).show();
    }
}
activity_main.xml
Design the layout and use the variable we declared for onClick event wherever you want to fire onClick Event.
android:onClick="@{variableName::methodName}"
We can also pass parameters to that to process.
android:onClick="{(v) -> handler.onClicked(v,user)}"
For that, define onClicked() method as follows:
fun onClicked(view: View, user: User){
...
...
}
<?xml version="1.0" encoding="utf-8"?>
<layout>
    <data>

        <variable
            name="user"
            type="com.yamikrish.databindingapp.model.User" />

        <variable
            name="handler"
            type="com.yamikrish.databindingapp.handler.ClickHandlers" />
    </data>

    <android.support.constraint.ConstraintLayout
        xmlns:android="http://schemas.android.com/apk/res/android"
        xmlns:app="http://schemas.android.com/apk/res-auto"
        android:layout_width="match_parent"
        android:layout_height="match_parent"
        android:onClick="@{handler::onClicked}">

        <TextView
            android:id="@+id/name"
            android:layout_width="match_parent"
            android:layout_height="wrap_content"
            android:text="@{user.name}"
            android:padding="5dp"
            app:layout_constraintLeft_toLeftOf="parent"
            app:layout_constraintRight_toRightOf="parent"
            app:layout_constraintTop_toTopOf="parent" />

        <TextView
            android:layout_width="match_parent"
            android:layout_height="wrap_content"
            android:text="@{user.mobile}"
            android:padding="5dp"
            app:layout_constraintLeft_toLeftOf="parent"
            app:layout_constraintRight_toRightOf="parent"
            app:layout_constraintTop_toBottomOf="@+id/name" />

    </android.support.constraint.ConstraintLayout>
</layout>
MainActivity.kt
Bind the class ClickHandler with MainActivity to listen the firing of onClick event.
class MainActivity : AppCompatActivity() {

    override fun onCreate(savedInstanceState: Bundle?) {
        super.onCreate(savedInstanceState)
        val binding = DataBindingUtil.setContentView<ActivityMainBinding>(this, R.layout.activity_main)
        val user = User("Yami","919999999999")
        binding.user = user

        val handlers =  ClickHandlers(this)
        binding.handler = handlers
    }
}
Run Application:
(iii) With String Append:
Sometimes, we would like to append some string/text with model value. We can do that also in layout file. One of the technique to do that is as follows:
"@{(@string/name).concat(user.name)}"
"@{(user.name).concat(user.mobile)}"
"@{(`Name:`).concat(user.name)}" // Use Grave Accent key (`)
<?xml version="1.0" encoding="utf-8"?>
<layout>
    <data>
        <variable
            name="user"
            type="com.yamikrish.databindingapp.model.User" />

        <variable
            name="handler"
            type="com.yamikrish.databindingapp.handler.ClickHandlers" />
    </data>

    <android.support.constraint.ConstraintLayout
        xmlns:android="http://schemas.android.com/apk/res/android"
        xmlns:app="http://schemas.android.com/apk/res-auto"
        android:layout_width="match_parent"
        android:layout_height="match_parent"
        android:onClick="@{handler::onClicked}">

        <TextView
            android:id="@+id/name"
            android:layout_width="match_parent"
            android:layout_height="wrap_content"
            android:text="@{(@string/name).concat(` ` +user.name)}"
            android:padding="5dp"
            app:layout_constraintLeft_toLeftOf="parent"
            app:layout_constraintRight_toRightOf="parent"
            app:layout_constraintTop_toTopOf="parent" />

        <TextView
            android:layout_width="match_parent"
            android:layout_height="wrap_content"
            android:text="@{(@string/mobile).concat(` ` +user.mobile)}"
            android:padding="5dp"
            app:layout_constraintLeft_toLeftOf="parent"
            app:layout_constraintRight_toRightOf="parent"
            app:layout_constraintTop_toBottomOf="@+id/name" />

    </android.support.constraint.ConstraintLayout>
</layout>
(iv) With <include> and Glide/Picasso:
- We can pass the data to <include> layout as well. For that, we have to pass the needed variable to it.
<include
....
....
bind:user="@{user}" />
On the <include> layout, we can access it as usual with <layout>, <data>, <variable> tags. No changes here.
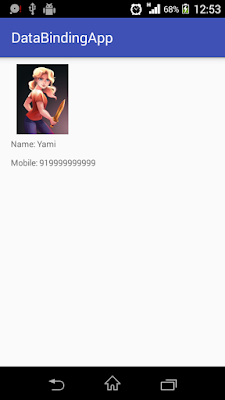
- For displaying image from url in ImageView , we have to use any third party like Glide or Picasso, etc. Is it can be done with Databinding??!! Yeah. We can do it.
In Kotlin, we can do this in no. of ways. But I found the following way is simpler. So I am showing you that one.
Using @BindingAdapter , we can do that. Also we have to create a Kotlin file, with no class or interface, but just the function, in which we can do that Glide/Picasso operations.
Using @BindingAdapter , we can do that. Also we have to create a Kotlin file, with no class or interface, but just the function, in which we can do that Glide/Picasso operations.
The parameter of @BindAdapter should be same as the one we are using in ImageView. Here, we are using "imageUrl", so inside the layout, it will be app:imageUrl="@{user.image}"
@BindingAdapter("imageUrl")
fun ImageView.setImageUrl(url: String?) {
    Glide.with(context).load(url).into(this)
}
activity_main.xml
<?xml version="1.0" encoding="utf-8"?>
<layout xmlns:bind="http://schemas.android.com/tools">

    <data>

        <variable
            name="user"
            type="com.yamikrish.databindingapp.model.User" />

        <variable
            name="handler"
            type="com.yamikrish.databindingapp.handler.ClickHandlers" />
    </data>

    <android.support.constraint.ConstraintLayout xmlns:android="http://schemas.android.com/apk/res/android"
        xmlns:app="http://schemas.android.com/apk/res-auto"
        android:layout_width="match_parent"
        android:layout_height="wrap_content"
        android:onClick="@{handler::onClicked}"
        android:padding="10dp">

        <include
            android:id="@+id/imageLayout"
            layout="@layout/content_image"
            app:layout_constraintLeft_toLeftOf="parent"
            app:layout_constraintRight_toRightOf="parent"
            app:layout_constraintTop_toTopOf="parent"
            bind:user="@{user}" />

        <TextView
            android:id="@+id/name"
            android:layout_width="0dp"
            android:layout_height="wrap_content"
            android:padding="5dp"
            android:text="@{(@string/name).concat(` ` +user.name)}"
            app:layout_constraintLeft_toLeftOf="parent"
            app:layout_constraintRight_toRightOf="parent"
            app:layout_constraintTop_toBottomOf="@+id/imageLayout" />

        <TextView
            android:id="@+id/mobile"
            android:layout_width="0dp"
            android:layout_height="wrap_content"
            android:padding="5dp"
            android:text="@{(@string/mobile).concat(` ` +user.mobile)}"
            app:layout_constraintLeft_toLeftOf="parent"
            app:layout_constraintRight_toRightOf="parent"
            app:layout_constraintTop_toBottomOf="@+id/name" />


    </android.support.constraint.ConstraintLayout>
</layout>
content_image.xml
<?xml version="1.0" encoding="utf-8"?>

<layout xmlns:android="http://schemas.android.com/apk/res/android"
    xmlns:app="http://schemas.android.com/apk/res-auto">

    <data>

        <variable
            name="user"
            type="com.yamikrish.databindingapp.model.User" />

    </data>


    <ImageView
        android:id="@+id/image"
        android:layout_width="100dp"
        android:layout_height="100dp"
        app:imageUrl="@{user.image}" />

</layout>
User.kt
data class User(var name: String, var mobile: String, var image: String)
MainActivity.kt
class MainActivity : AppCompatActivity() {
    override fun onCreate(savedInstanceState: Bundle?) {
        super.onCreate(savedInstanceState)
        val binding = DataBindingUtil.setContentView<ActivityMainBinding>(this, R.layout.activity_main)
        val user = User("Yami","919999999999",
                "https://www.readriordan.com/wp-content/uploads/2017/10/di_rickriordan_character_annabethchase5_NFK_cropped_1500.jpg")
        binding.user = user

        val handlers =  ClickHandlers(this)
        binding.handler = handlers
    }
}
Don't forget to add INTERNET permission in AndroidManifest.xml.
<uses-permission android:name="android.permission.INTERNET" />
Run Application
(iv) Visibility Control:
Sometimes, we want to show or hide a particular UI element depends on Model's particular field's value. Let's see how to do that in DataBinding.MainActivity.kt
Not much changes in MainActivity for this operation.
class MainActivity : AppCompatActivity() {

    override fun onCreate(savedInstanceState: Bundle?) {
        super.onCreate(savedInstanceState)
        val binding = DataBindingUtil.setContentView<ActivityMainBinding>(this, R.layout.activity_main)
        val user = User("Yami","919999999999",
                "https://www.readriordan.com/wp-content/uploads/2017/10/di_rickriordan_character_annabethchase5_NFK_cropped_1500.jpg",
                "yaminibalakrishnan@gmail.com", false)
        binding.user = user

        val handlers =  ClickHandlers(this)
        binding.handler = handlers
    }
}
BindingAdapters.kt
We have to just add another function for show or hide the layout element in BindingAdapter class
@BindingAdapter("imageUrl")
fun ImageView.setImageUrl(url: String?) {
    Glide.with(context).load(url).into(this)
}

@set:BindingAdapter("visibleOrGone")
var View.visibleOrGone
    get() = visibility == VISIBLE
    set(value) {
        visibility = if (value) VISIBLE else GONE
    }
User.kt
data class User(var name: String, var mobile: String, var image: String, var email: String, var showEmail: Boolean)
activity_main.xml
We have to call that method visibleOrGone in layout elements we wish to show/hide.
app:visibleOrGone="@{user.showEmail}"
<?xml version="1.0" encoding="utf-8"?>
<layout xmlns:bind="http://schemas.android.com/tools">
    <data>

        <variable
            name="user"
            type="com.yamikrish.databindingapp.model.User" />

        <variable
            name="handler"
            type="com.yamikrish.databindingapp.handler.ClickHandlers" />
    </data>

    <android.support.constraint.ConstraintLayout
        xmlns:android="http://schemas.android.com/apk/res/android"
        xmlns:app="http://schemas.android.com/apk/res-auto"
        android:layout_width="match_parent"
        android:layout_height="wrap_content"
        android:onClick="@{handler::onClicked}"
        android:padding="10dp">

        <include
            android:id="@+id/imageLayout"
            layout="@layout/content_image"
            app:layout_constraintLeft_toLeftOf="parent"
            app:layout_constraintRight_toRightOf="parent"
            app:layout_constraintTop_toTopOf="parent"
            bind:user="@{user}"
            />

        <TextView
            android:id="@+id/name"
            android:layout_width="0dp"
            android:layout_height="wrap_content"
            android:text="@{(@string/name).concat(` ` +user.name)}"
            android:padding="5dp"
            app:layout_constraintLeft_toLeftOf="parent"
            app:layout_constraintRight_toRightOf="parent"
            app:layout_constraintTop_toBottomOf="@+id/imageLayout" />

        <TextView
            android:id="@+id/mobile"
            android:layout_width="0dp"
            android:layout_height="wrap_content"
            android:text="@{(@string/mobile).concat(` ` +user.mobile)}"
            android:padding="5dp"
            app:layout_constraintLeft_toLeftOf="parent"
            app:layout_constraintRight_toRightOf="parent"
            app:layout_constraintTop_toBottomOf="@+id/name" />

        <TextView
            android:id="@+id/email"
            android:layout_width="0dp"
            android:layout_height="wrap_content"
            android:text="@{(@string/email).concat(` ` +user.email)}"
            android:padding="5dp"
            app:visibleOrGone="@{user.showEmail}"
            app:layout_constraintLeft_toLeftOf="parent"
            app:layout_constraintRight_toRightOf="parent"
            app:layout_constraintTop_toBottomOf="@+id/mobile" />

    </android.support.constraint.ConstraintLayout>
</layout>
Run Application
(v) Listening Updates:
In DataBinding, Once the changes has been done in any field, it will automatically captured and UI will be updated. The changes in the variables/fields can be listened using either using Observable or ObservableField.
Using Observable:
If you would like to listen all fields of Model class, you can use Observable to do so. For that, three steps to be done.
- Model class is to be extended with BaseObservable
- The getter method to be written with @Bindable
- Call notifyPropertyChanged(BR.propertyName) in setter method to update the UI whenever necessary.
Then BR class will be generated automatically.
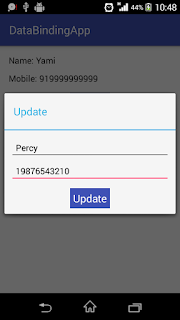
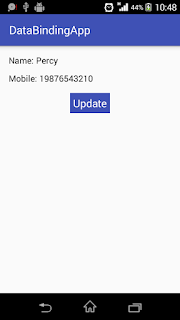
Let's see this through an example. Here, let's add a button 'Update', while clicking on that, a dialog with input fields for Name and Email will be opened. After entered, the details and click on 'Update',
dialog will be closed and entered details will be updated automatically.
activity_main.xml
<?xml version="1.0" encoding="utf-8"?>
<layout>

    <data>

        <variable
            name="user"
            type="com.yamikrish.databindingapp.model.UserModel" />

        <variable
            name="handler"
            type="com.yamikrish.databindingapp.handler.ClickHandlers" />
    </data>

    <android.support.constraint.ConstraintLayout xmlns:android="http://schemas.android.com/apk/res/android"
        xmlns:app="http://schemas.android.com/apk/res-auto"
        android:layout_width="match_parent"
        android:layout_height="wrap_content"
        android:padding="10dp">

        <!--    <include
                android:id="@+id/imageLayout"
                layout="@layout/content_image"
                app:layout_constraintLeft_toLeftOf="parent"
                app:layout_constraintRight_toRightOf="parent"
                app:layout_constraintTop_toTopOf="parent"
                bind:user="@{user}" />-->

        <TextView
            android:id="@+id/name"
            android:layout_width="0dp"
            android:layout_height="wrap_content"
            android:padding="5dp"
            android:text="@{(@string/name).concat(` ` +user.name)}"
            android:textAppearance="@android:style/TextAppearance.Medium"
            app:layout_constraintLeft_toLeftOf="parent"
            app:layout_constraintRight_toRightOf="parent" />

        <TextView
            android:id="@+id/mobile"
            android:layout_width="0dp"
            android:layout_height="wrap_content"
            android:padding="5dp"
            android:text="@{(@string/mobile).concat(` ` +user.mobile)}"
            android:textAppearance="@android:style/TextAppearance.Medium"
            app:layout_constraintLeft_toLeftOf="parent"
            app:layout_constraintRight_toRightOf="parent"
            app:layout_constraintTop_toBottomOf="@+id/name" />

        <TextView
            android:id="@+id/update"
            android:layout_width="wrap_content"
            android:layout_height="wrap_content"
            android:layout_marginTop="10dp"
            android:background="@color/colorPrimary"
            android:padding="5dp"
            android:text="@string/update"
            android:textColor="@color/white"
            android:textAppearance="@android:style/TextAppearance.Large"
            android:onClick="@{(v) -> handler.onClicked(v, user)}"
            app:layout_constraintLeft_toLeftOf="parent"
            app:layout_constraintRight_toRightOf="parent"
            app:layout_constraintTop_toBottomOf="@+id/mobile" />


    </android.support.constraint.ConstraintLayout>
</layout>
edit_dialog.xml
<?xml version="1.0" encoding="utf-8"?>
<android.support.constraint.ConstraintLayout xmlns:android="http://schemas.android.com/apk/res/android"
    android:layout_width="match_parent"
    android:layout_height="wrap_content"
    android:layout_margin="10dp"
    xmlns:app="http://schemas.android.com/apk/res-auto">

    <EditText
        android:id="@+id/input_name"
        android:layout_width="0dp"
        android:layout_height="wrap_content"
        android:padding="10dp"
        android:inputType="text"
        android:hint="@string/enter_name"
        app:layout_constraintLeft_toLeftOf="parent"
        app:layout_constraintRight_toRightOf="parent"
        app:layout_constraintTop_toTopOf="parent"/>

    <EditText
        android:id="@+id/input_mobile"
        android:layout_width="0dp"
        android:layout_height="wrap_content"
        android:padding="10dp"
        android:hint="@string/enter_mobile"
        android:inputType="number"
        app:layout_constraintLeft_toLeftOf="parent"
        app:layout_constraintRight_toRightOf="parent"
        app:layout_constraintTop_toBottomOf="@+id/input_name"/>

    <TextView
        android:id="@+id/update_mobile"
        android:layout_width="wrap_content"
        android:layout_height="wrap_content"
        android:layout_marginTop="10dp"
        android:background="@color/colorPrimary"
        android:padding="5dp"
        android:text="@string/update"
        android:textColor="@color/white"
        android:textAppearance="@android:style/TextAppearance.Large"
        android:onClick="@{handler::onClicked}"
        app:layout_constraintLeft_toLeftOf="parent"
        app:layout_constraintRight_toRightOf="parent"
        app:layout_constraintTop_toBottomOf="@+id/input_mobile" />

</android.support.constraint.ConstraintLayout>
UserModel.kt
data class UserModel(var _name: String, var _mobile: String) : BaseObservable(){
    var name: String
        @Bindable get() = _name
        set(value) {
            _name = value
            notifyPropertyChanged(BR.name)
        }

    var mobile: String
        @Bindable get() = _mobile
        set(value) {
            _mobile = value
            notifyPropertyChanged(BR.mobile)
        }
}
ClickHandler.kt
class ClickHandlers(val context: Context) {
    fun onClicked(view: View, user: UserModel) {
        val dialog = Dialog(context)
        dialog.apply {
            setTitle(context.getString(R.string.update))
            setContentView(R.layout.edit_dialog)
            val inputName = findViewById<EditText>(R.id.input_name)
            val inputMobile = findViewById<EditText>(R.id.input_mobile)
            val updateMobile = findViewById<TextView>(R.id.update_mobile)
            updateMobile.setOnClickListener {
                if (inputMobile.text.toString().trim().length > 0 && inputName.text.toString().trim().length > 0){
                    user.name = inputName.text.toString().trim()
                    user.mobile = inputMobile.text.toString().trim()
                    dismiss()
                }else{
                    Toast.makeText(context, context.getString(R.string.fill_field),Toast.LENGTH_SHORT).show()
                }
            }
            show()
        }
    }
}
MainActivity.xml
Just bind the layout and handler to the class, MainActivity.
class MainActivity : AppCompatActivity() {

    override fun onCreate(savedInstanceState: Bundle?) {
        super.onCreate(savedInstanceState)
        val binding = DataBindingUtil.setContentView<ActivityMainBinding>(this, R.layout.activity_main)
        val user = UserModel("Yami","919999999999")
        binding.user = user

        val handlers =  ClickHandlers(this)
        binding.handler = handlers
    }
}
Run Application:
That's it!! We are done!! Now we have learnt about DataBinding in Android with Kotlin. Try that too!!
If you would like to use databinding in RecyclerView, you can check, here.
You can find the whole project in Github.
Byee!!




Comments
Post a Comment